0. Introduction
Note – This document was created using AI translation.This document explains the basic usage of the Excel numerical computation software XLPack.
This chapter provides an overview, including how to obtain and use example worksheets. The following chapters will explain the usage of XLPack in various fields of numerical computation in detail.
You can download example worksheets that contain the exercises used in this explanation, and it is recommended that you try them while reading the guide. The examples can be executed using XLPack Basic.
Note that this document does not cover detailed solution methods, but they will be discussed separately in the “Numerical Computation Solution Methods” document.
0.1 Structure of XLPack
XLPack consists of two tools: one for performing numerical computations without programming and another for supporting programming. The first includes worksheet function libraries and solvers, while the second provides VBA subroutine/function libraries.
These tools can be easily used by leveraging the example worksheets as templates. Additionally, the manual includes usage examples for most subroutines/functions, except for some simple ones, which can be used as references.
0.1.1 Performing Numerical Computations Without Programming
Using worksheet functions or solvers, calculations can be performed without requiring programming.
0.1.1.1 Worksheet Function Library
Worksheet functions are functions that can be directly written in an Excel worksheet. XLPack’s worksheet functions are broadly categorized into two types: those that return a single value and those that return an array of values, such as vectors or matrices.
The former includes special functions, which are used in formulas similarly to standard Excel functions.
The latter, unlike standard Excel functions, return array-type results. The main functions include those related to linear computations (such as solving systems of linear equations, eigenvalues/eigenvectors, and least squares methods). Additionally, interpolation, algebraic equations, and FFT (Fast Fourier Transform) are included in this category.
To input these functions into a worksheet, select the cell range where the results will be output. Then, either click “fx” in the formula bar or press “Shift” + “F3” to display the “Insert Function” dialog. From there, select the desired function. After setting the parameters, instead of clicking “OK” or pressing “Enter,” press “Ctrl” + “Shift” + “Enter.” (See section 0.3.3.2 below.)
0.1.1.2 XLPack Solver
Similar to Excel’s built-in solver, XLPack’s solver is an add-in that advances calculations by referencing specified cells through menu operations. It enables calculations by simply entering the necessary formulas and data into a worksheet. (See section 0.3.3.4 below.)
Supported computations include nonlinear equations, nonlinear optimization, nonlinear least squares, numerical integration, and ordinary differential equations.
0.1.2 Supporting VBA Numerical Computation Programming
0.1.2.1 VBA Subroutine/Function Library
The VBA subroutine/function library consists of subroutines/functions that can be called from VBA programs. When numerical computation programming is necessary in VBA, these functions allow specialized computations to be handled by the library, while users mainly focus on input/output processes. (See section 0.3.3.3 below.)
0.2 Fields of Numerical Computation Covered
XLPack covers nearly all general fields of numerical computation. The following chapters explain the usage of XLPack with examples for each field.
1. Special Functions
2. Systems of Linear Equations
3. Eigenvalues and Eigenvectors
4. Linear Least Squares
5. Interpolation Methods
6. Algebraic Equations
7. Single-Variable Nonlinear Equations
8. Multi-Variable Nonlinear Equations
9. Single-Variable Nonlinear Optimization
10. Multi-Variable Nonlinear Optimization
11. Numerical Integration
12. Ordinary Differential Equations (ODE)
13. Fast Fourier Transform (FFT)
14. Nonlinear Least Squares
15. Random Numbers
16. Sparse Matrix Computations and Partial Differential Equations (PDE)
0.3 Obtaining and Using Example Worksheets
0.3.1 Obtaining Example Worksheets
Example worksheets are publicly available for download at the following link:
![]()
(This will open in a new tab.)
FYR: More sample worksheets featuring additional functions are also available here:
Visit the Downloads page and check out the “Sample Worksheets.”
0.3.2 Prerequisites for Using Example Worksheets
To use the example worksheets, the following environment is required:
- Windows 10 (version 22H2) or Windows 11
- Excel (Office) 365, 2024, 2021, 2019, or 2016
If these requirements are met, follow the steps in the User Guide to install and set up the necessary software:
- Install XLPack Basic (User Guide Section 3)
- Integrate the Add-in (User Guide Section 5: “Integrating the Add-in”)
After completing these steps, you’re ready to proceed.
0.3.3 How to Use the Example Worksheets
0.3.3.1 Structure of the Example Workbook
The downloaded example workbook contains three types of example worksheets: worksheets using worksheet functions, worksheets using VBA programs, and worksheets using solvers.
Worksheet names follow the format “Ex + Number + Symbol.” The number represents the chapter number in this introduction. The symbol “W” indicates worksheets using worksheet functions, “S” indicates worksheets using solvers, and no symbol indicates worksheets using VBA programs.
Example:
Ex2 – An example worksheet using VBA programs for “2. Systems of Linear Equations”
Ex2W – An example worksheet using worksheet functions for “2. Systems of Linear Equations”
Ex8S – An example worksheet using solvers for “8. Nonlinear Systems of Equations”
Standard module names for VBA programs follow the format “Ex + Number,” where the number represents the chapter.
0.3.3.2 How to Use Example Worksheets with Worksheet Functions
This section explains how to use an example worksheet based on “2. Systems of Linear Equations.”
Example Problem
Solve the following system of linear equations:
\[
\begin{align}
& 10x_1 – 7x_2 = 7 \\
& -3×1 + 2x_2 + 6x_3 = 4 \\
& 5x_1 – x_2 + 5x_3 = 6 \\
\end{align}
\]
Represented in matrix form:
\[
\boldsymbol{A}\boldsymbol{x} = \boldsymbol{b}
\]
Where:
\[
\boldsymbol{A} =
\begin{pmatrix}
10 & -7 & 0 \\
-3 & 2 & 6 \\
5 & -1 & 5 \\
\end{pmatrix},
\boldsymbol{b} =
\begin{pmatrix}
7 \\
4 \\
6 \\
\end{pmatrix},
\boldsymbol{x} =
\begin{pmatrix}
x_1 \\
x_2 \\
x_3 \\
\end{pmatrix}
\]
Here, \(\boldsymbol{A}\) is the coefficient matrix, \(\boldsymbol{b}\) is the right-hand side vector, and \(\boldsymbol{x}\) is the solution vector.
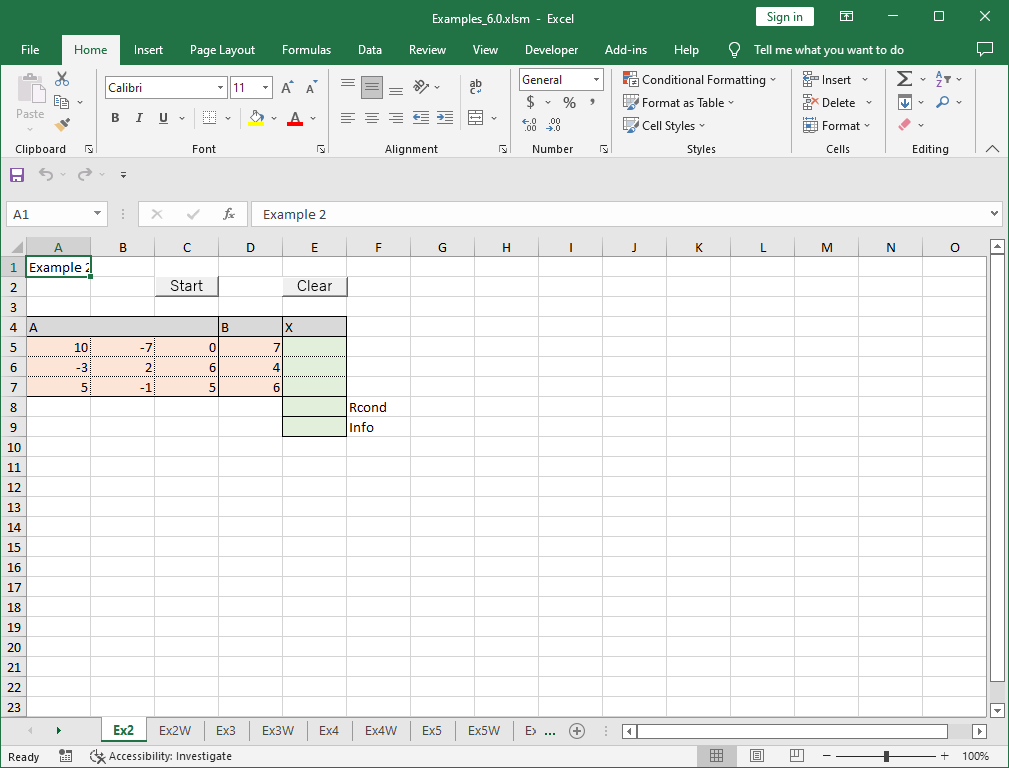
In the example worksheet: Orange cells indicate areas where data (or formulas) should be entered; Green cells indicate areas where worksheet functions should be entered.
The example worksheet available for download already has worksheet functions entered in the green cells. However, this explanation starts from the beginning.
Enter the coefficient matrix \(\boldsymbol{A}\) and the right-hand side vector \(\boldsymbol{b}\) in appropriate cells (orange cells). Then select the output cell range for the solution vector (green cells), which should be number of elements + 2 cells.
Click “fx” in the formula bar, then select WDgesv from the XLPack function category.
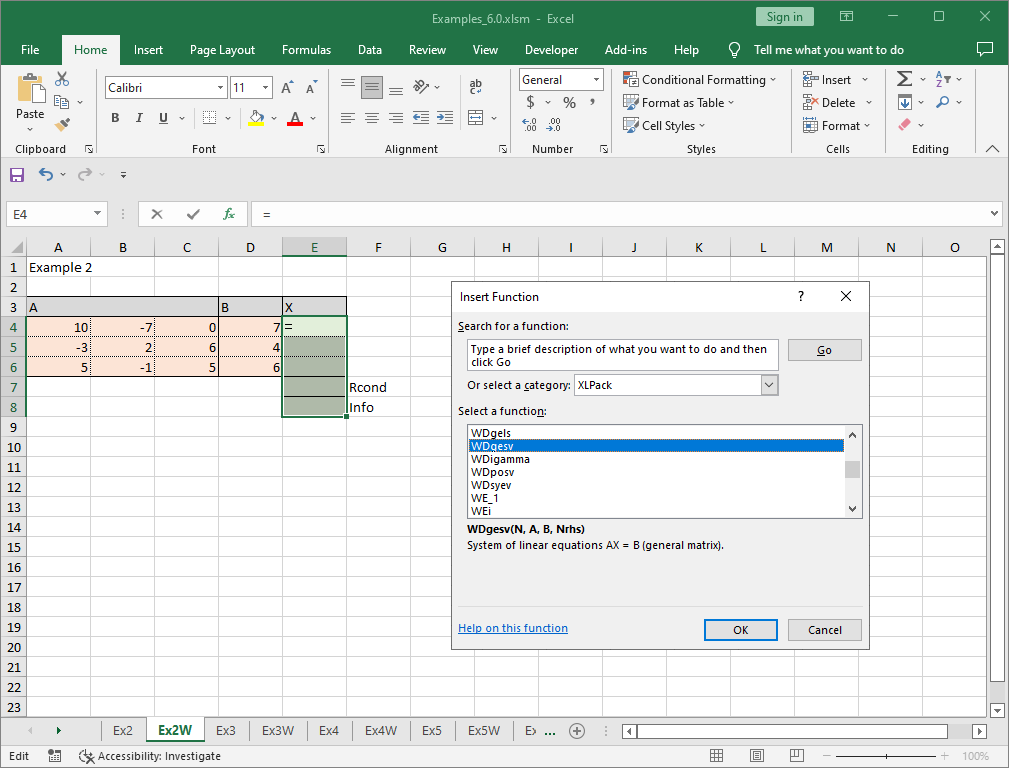
Enter the required parameters (N, A, B, Nrhs).
N: Number of elements (3 in this example).
A: Range of the coefficient matrix \(\boldsymbol{A}\).
B: Range of the right-hand side vector \(\boldsymbol{b}\).
Nrhs: Number of right-hand-side vectors (used when solving for multiple b values; defaults is 1 if omitted).
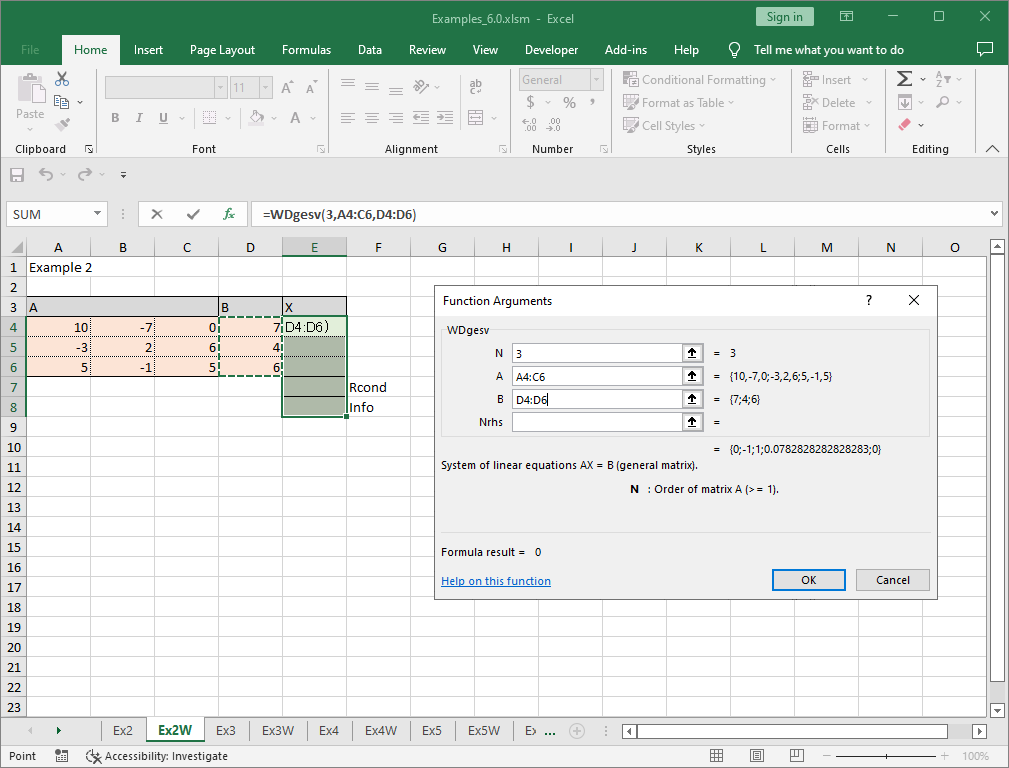
After entering the parameters, press Ctrl + Shift + Enter.
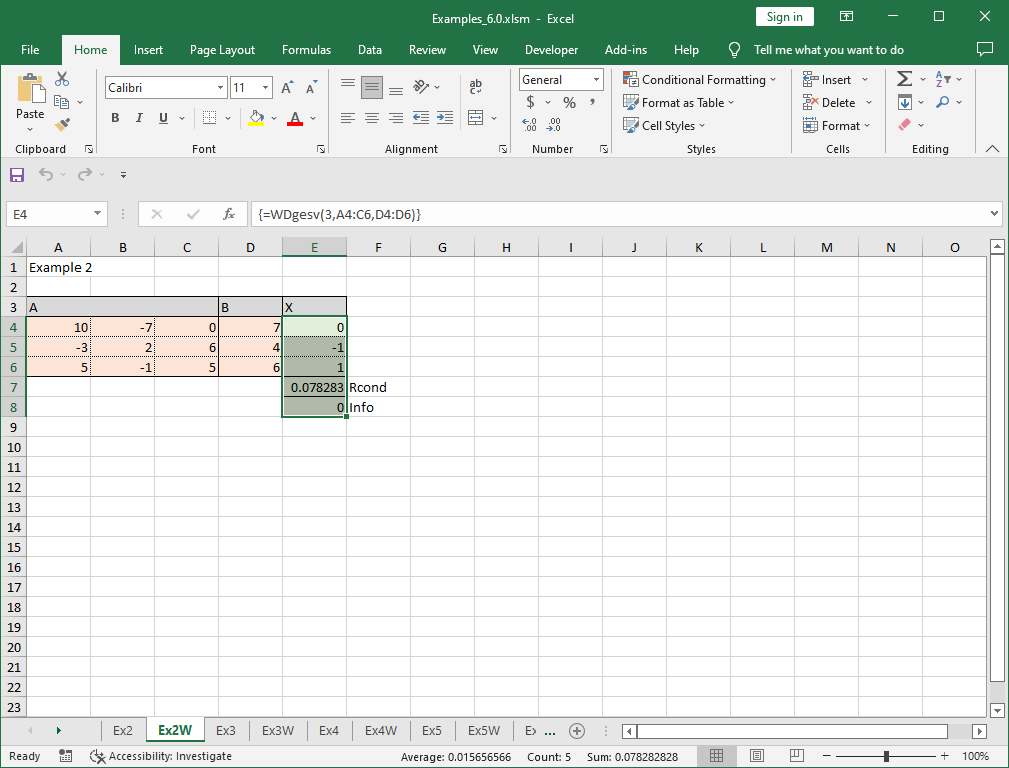
The solution \(\boldsymbol{x} = \begin{pmatrix} 0 & -1 & 1\end{pmatrix}^T\) is computed. The value 0.078283 displayed is the inverse of an estimated condition number. The final value 0 is the return code, indicating normal completion.
The output range includes two extra cells to display these additional values, but if only three output cells are selected, only the solution will be shown.
0.3.3.3 How to Use Example Worksheets with VBA Programs
This section explains the usage based on the example for “2. Systems of Linear Equations.”
Orange cells indicate where data (or formulas) should be entered. Green cells indicate where the VBA program will write results.
The program is stored in the standard module Ex2.
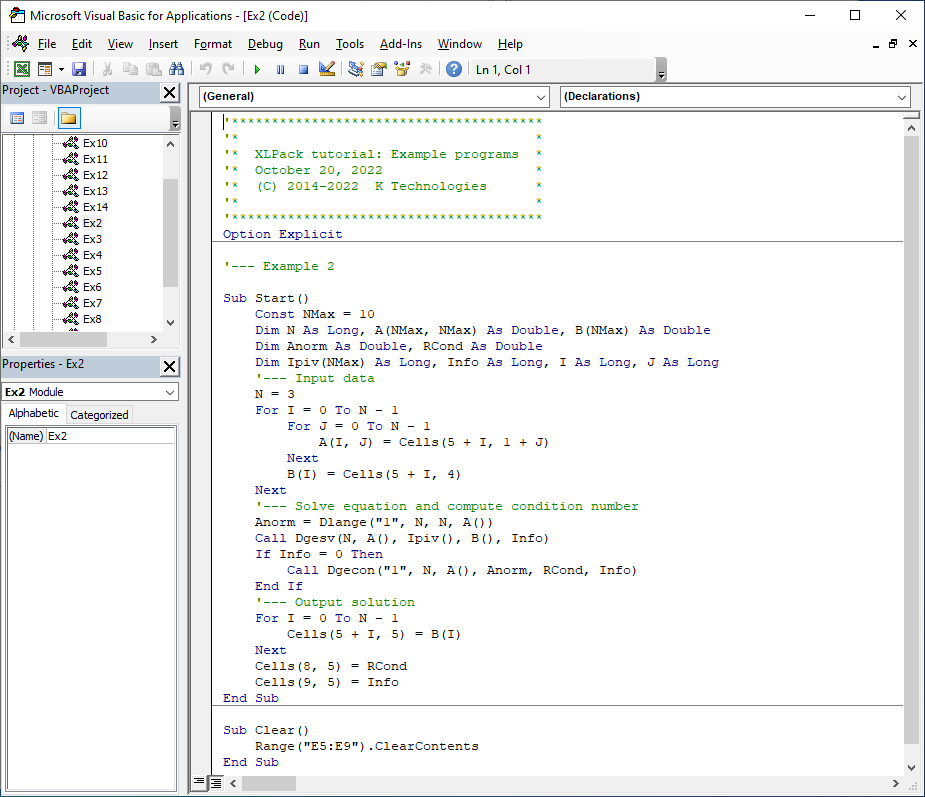
To execute the program, click “Developer” → “Macros”, select Ex2.Start, and click “Run”. Alternatively, clicking the “Start” button will run the macro assigned to it.
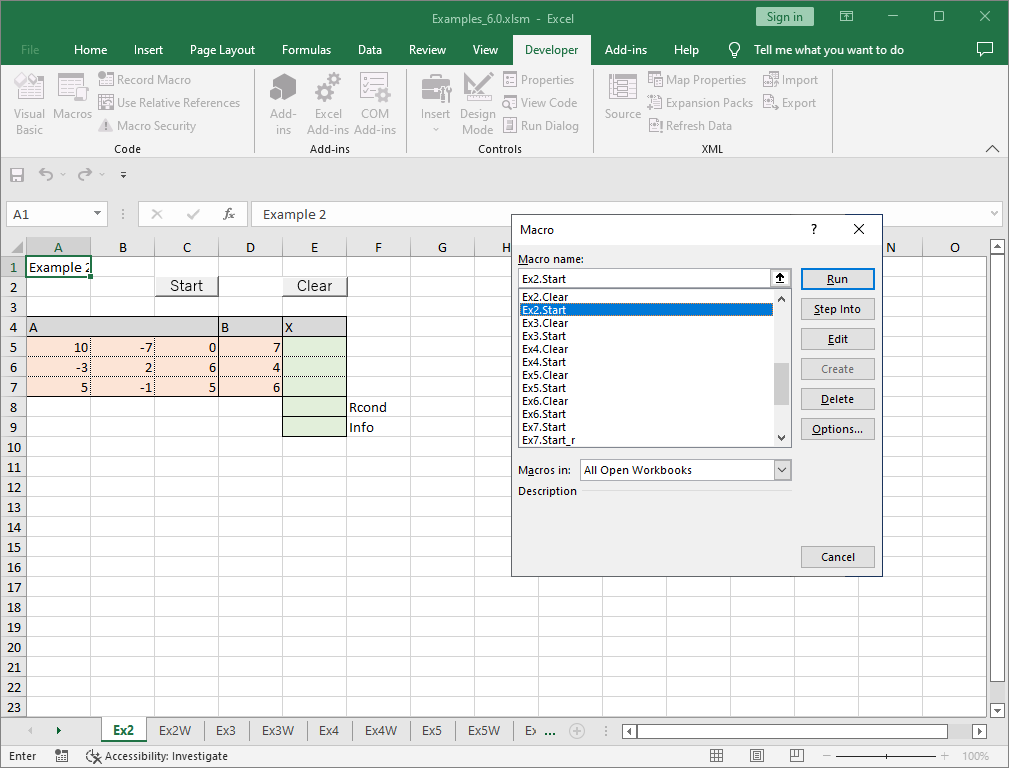
Results will be written in the green cells.
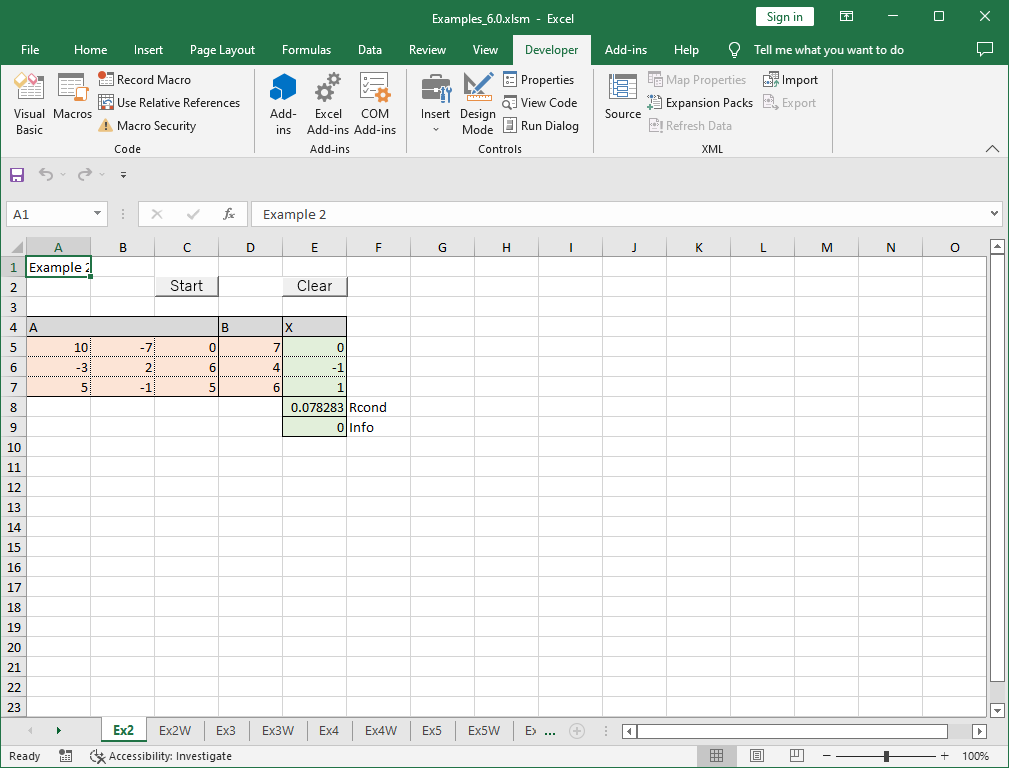
The “Clear” button contains a macro that clears the green cells.
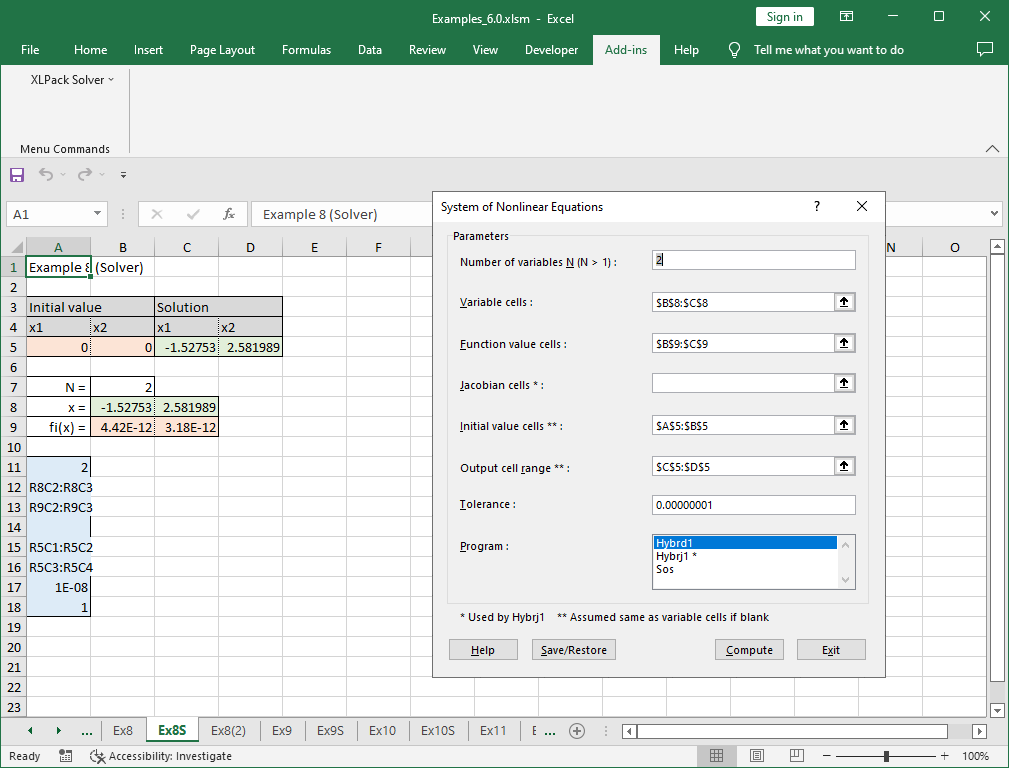
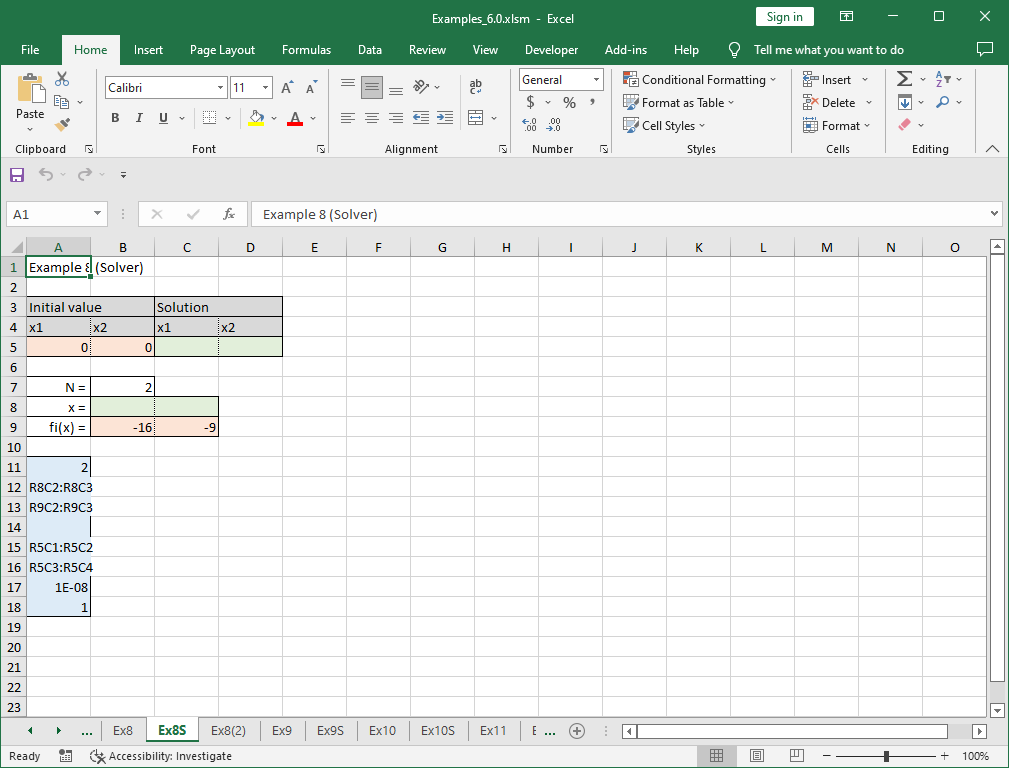
0.3.3.4 How to Use Example Worksheets with Solvers
This section explains the usage based on the example for “8. Nonlinear Systems of Equations.”
Example Problem
Solve the following nonlinear system of equations:
\[
\begin{align}
&f_1(x_1, x_2) = 4x_1^2 + x_2^2 – 16 = 0 \\
&f_2(x_1, x_2) = x_1^2 + x_2^2 – 9 = 0 \\
\end{align}
\]
Orange cells indicate where data (or formulas) should be entered. Green cells indicate where the solver will write results. Blue cells represent the storage area for solver parameters.
Set A5 and B5 as the variables \(x_1\) and \(x_2\). Enter the first equation in B9 (=4*B8^2+C8^2-16) and the second equation in C9 (=B8^2+C8^2-9).
Click “Add-ins” → “XLPack Solver” → “Nonlinear Systems of Equations”.
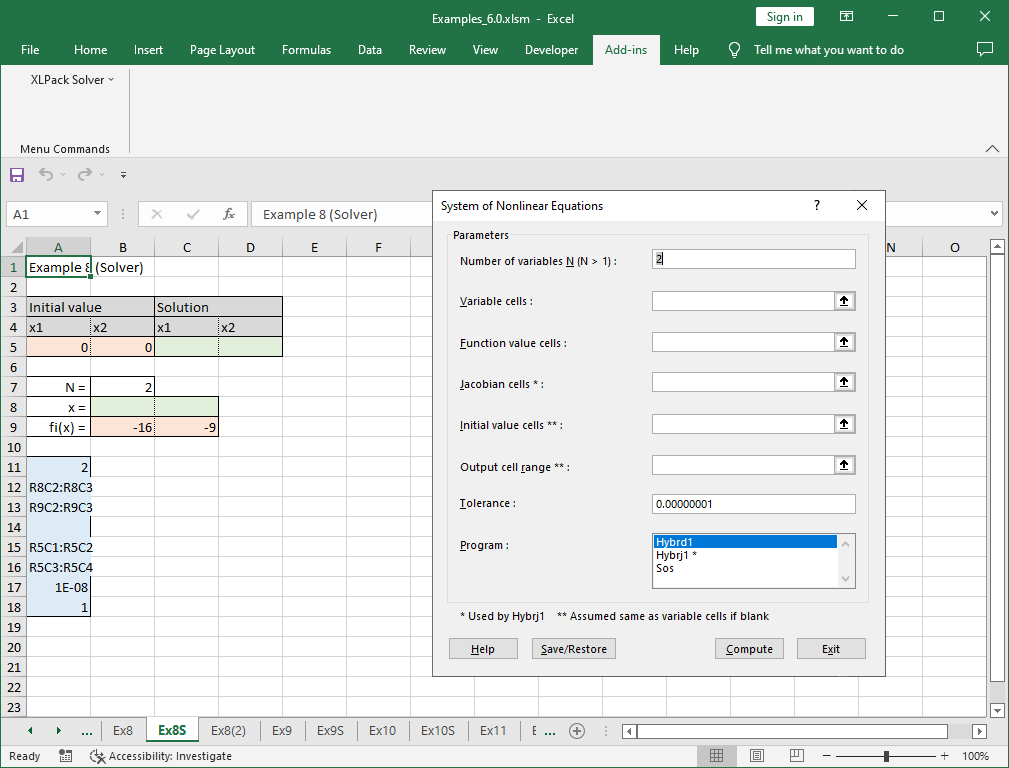
Click “Save/Load (S)”.
Select the blue storage area, then click “Load”.
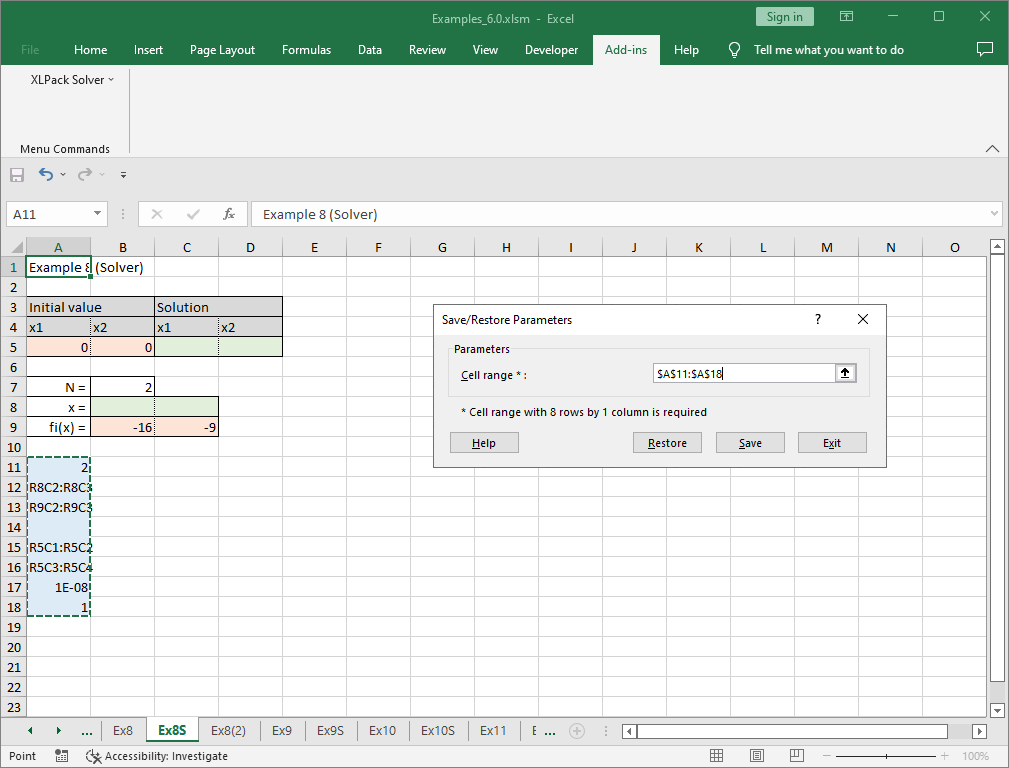
The required parameters will be set in the solver.
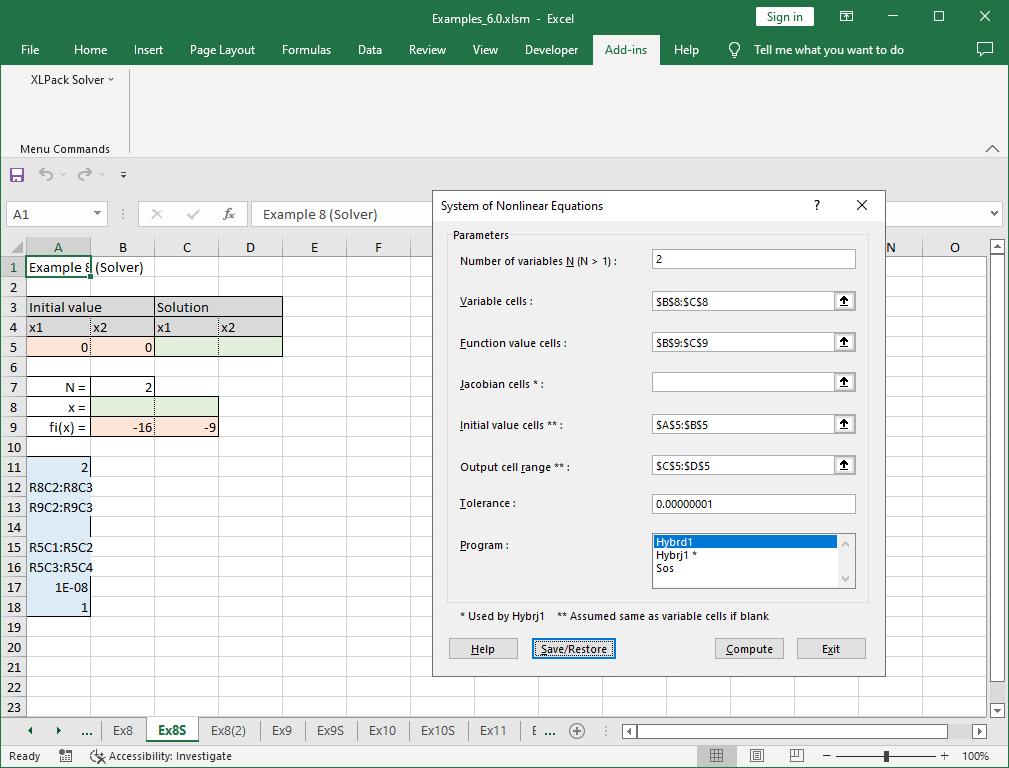
Click “Start Calculation”, and the solver will write the results in the green cells.